Salted dough apples. We sculpt and color apples
Who needs to decorate something? Like Golden Apples? It’s simple, we’ll make a lot of them now, we have a bumper harvest today! How will we do it? Let's first watch a master class from a craftswoman m tascha, she turned out absolutely wonderful apples. By the way, you can, of course, make such apples from papier-mâché, but we can do it even faster, and salt dough will help us!
Hello, dear friends! I have a workshop on making and decorating apples. I was so fascinated by this activity that I couldn’t stop)))
I. Making an apple from salt dough.
For work we will need materials: paper, foil, salt dough, Titan glue, petiole.
Tools and accessories: kebab skewer (knitting needle), modeling board, rolling pin.
Let's get to work. First you need to crumple a sheet of paper (any kind will do, I take A4 drafts) and squeeze it tightly into a ball, wrap it on top with another sheet of paper and squeeze it again. Repeat steps until the desired size of the workpiece.

Wrap the workpiece in foil and insert a skewer or knitting needle so as not to damage the apple during drying.

Separate part of the dough, knead it and form into a ball. Place on a board, press with your palm and roll out.

Wrap the prepared dough around the workpiece and shape the apple so that the skewer can then be replaced with a stem.

Insert the skewer with the apple into a heavy container (bottle, jar) and dry thoroughly. Then remove the skewer and glue the stem in its place (if desired, this operation can be performed during or after decorating).
The apple is ready, now you can start decorating.
II. Apple decor using the paper art technique using eggshells.
Materials: salted dough apple; paper napkins; eggshell; PVA glue; “Gouache” or acrylic paint - black, “Metallic” - gold, bronze; acrylic spray varnish.
Tools and accessories: pencil, eraser, brushes, sponge, napkin, water glass, tweezers.
And so, we dress up our apple)). I've done three. I'll show you everything. First you need to apply a drawing (pattern) with a simple pencil to the apple blank.


Cut a paper napkin into strips and roll into flagella using water. Lay out the pattern according to the drawing with wet paper flagella, fixing with PVA glue. Dry well. Lay out the free space with a mosaic made of eggshells using PVA glue. Dry well.
You can use other materials for decoration. In the first apple I made the centers from split peas.


Prime the apple with black paint and let it dry again. If you use Gouache as a primer, then after drying you need to cover the surface of the apple with acrylic aerosol varnish to avoid mixing the paints in further work.

First paint the apple with gold paint, after drying with bronze, imitating an aged metal surface. Allow to dry well and varnish.


Second apple.

And the third apple.

And all three together. The photo shows that the apples are of different sizes. The largest is 9.5*9.5 cm.
OK it's all over Now. I will be glad if my MK is useful to someone. I wish you all a good mood and joy in what you are doing!
You can make a huge number of crafts from salt dough, for example: flowers, animals, various figures, inscriptions, numbers, toys, paintings and whatever you want! Modeling from salt dough is called bioceramics. The advantage of salt dough is that it is convenient to work with, this material is absolutely harmless and crafts made from it will delight you for several years. In this article we will look at how to make crafts from salt dough with your own hands.
You will need: a glass of wheat flour, a glass of extra salt, half a glass of cold water, a bowl.
Recipe

The finished salted dough should not stick to your hands or crumble. It should be cool and easy to sculpt. I recommend watching the video master class!
There are two most common ways to dry salt dough. The first method: the finished craft will dry on its own. The main thing is that it should not be exposed to direct sunlight, otherwise it will crack. The craft can be placed on a flat surface and wait a few days. Second method: dry the finished craft in the oven for 3 to 6 hours (depending on the size of the craft). Drying occurs in batches with breaks. One approach is 1-2 hours. For quick drying in one go, set the oven to 75-100 degrees, and then the craft will dry in an hour. At a temperature of 120 degrees, the craft will dry in 30 minutes, but it is better to dry it naturally.
There are two most common ways to color salt dough. The first method: after drying, paint the finished craft with acrylic paints or gouache using a brush. Second method: food coloring is diluted in water, then added while preparing the dough. When the craft is completely painted and dried, it must be coated with transparent manicure or furniture varnish in 2-3 layers. Each layer must dry before applying the next. This way the craft will last for a long time.
You will need: colored salt dough, stack, clear manicure polish, toothpick.
Master Class

The salt dough star is ready!
Salt dough caterpillar
You will need: colored dough, knife, pva glue, toothpick, pendant, clear manicure polish.
Master Class
- Roll out the sausage.
- Cut it into 6 equal parts.
- Roll into balls.
- Glue 5 balls together.
- Glue the head.
- Make a nose and eyes, then glue them on.
- Poke a toothpick into the hanging area.
- Dry the craft.
- Attach the pendant.
The salt dough caterpillar is ready!
Salt dough apple
You will need:
Master Class
- Make half an apple, make the inside flat, pressing it onto a flat surface.
- Make a thin flat center and glue it to the main part.
- Roll 6 seeds and a stick, then glue to the apple.
- Blind the leaves, then glue them.
- Dry the craft.
- Apply varnish and wait until completely dry.
The salted dough apple is ready!
Salt dough elephant
You will need: colored salt dough, pva glue, clear manicure polish.
Master Class
- Make the elephant's body by rolling an elongated ball.
- Make 4 legs in the shape of plump sausages.
- Make a proboscis.
- Make the elephant's ears in this way: roll out 2 flat cakes, glue flat cakes of the same shape of a smaller size and a different color to them.
- Make a small ponytail.
- Blind your eyes.
- Assemble the elephant in the following sequence: glue the legs to the body, then glue the proboscis, then the ears, eyes and tail.
- Dry the craft.
- Apply varnish and wait until completely dry.
The salt dough elephant is ready!
You will need: salt dough, foil, a candy bowl or similar plastic container, gouache, a brush, clear manicure polish, a modeling board, a knife or a stack.
Master Class

You will need: salt dough, nail scissors, PVA glue, acrylic paints or gouache, manicure brush.
Master Class
Salt dough hedgehog is ready!
Owl (eagle owl) made from salt dough
You will need: salt dough, pva glue, nail file, manicure scissors, acrylic paints or gouache, brush, wooden board with a pendant, clear manicure varnish.
Master Class

The salt dough owl is ready!
You will need: salted dough, the base on which the craft will be attached, for example, a board or plate, a glass or a knife, a sheet of paper, a simple pencil, a garlic press, a rolling pin, pva glue, acrylic paints or gouache, a brush, clear manicure polish, cloves.
Master Class

Salted dough fruit basket is ready! I recommend watching the video master class!
You will need: salt dough, knife, rolling pin, simple pencil, sheet of paper, sandpaper, acrylic paints or gouache, brush, transparent manicure varnish, glue gun or pva, base for crafts, for example: a board with a frame, transparent manicure varnish.
Master Class
- Draw a cat or print a template.

- Roll out the dough into a thin layer.
- Attach the template and cut out the cat.

- Dry the craft.
- Sand the craft with sandpaper, removing any unevenness.
- Using a simple pencil, transfer the desired design onto the cat’s body.
- Paint with paints and wait until completely dry.

- Glue the cat onto the base with the frame.
Salt dough pencil
You will need: water, flour, extra salt, cardboard jar for the frame, PVA glue, scissors, a piece of decorative rope or corrugated paper, gouache, brush, button, stacks, acrylic varnish for crafts, toothbrush.
Master Class
- Knead the salted dough in this way: add a glass of flour, a glass of salt, add water, then knead until the desired consistency of the dough. Separate part of the dough, add beige gouache, then knead.
- Roll out the cake to a thickness of 10-15 mm.

- Apply PVA glue to the outer rim of the jar and wrap it with dough. Cut off the excess with a stack and smooth the joints with a damp brush.
- Create a small dotted texture with a toothbrush on the surface of the dough.
- Knead the brown dough, roll it into a flat cake 10-15mm thick.

- Cut a 5cm wide strip of brown pastry and glue it to the bottom of the jar.
- Make 2 large owl eye bases from white dough, then glue them on.
- Make a beak out of brown dough and glue it on.
- Make eyes from turquoise dough and glue them on.
- Roll out 8 strips of pink dough, twist them into 4 flagella and make a bow, then leave it to dry for 2 hours.
- Make droplet-shaped owl wings using brown dough, then glue them on.

- Weave ropes of beige dough and glue them onto the neck of the jar.
- Roll out a sausage from white dough, draw the texture of the lace with a stack and glue it as a collar under the beak.
- Place the craft in a warm place for a day.
- Paint the bottom and wings with brown gouache and decorate with white dots.

- Draw the pupils and eyelashes with black gouache, wait until the paint dries, then paint white highlights on the eyes.
- Glue a pink bow above the wing.
- Glue a button with a bow from a corrugated strip onto the lace.
- Cover the craft with varnish and wait until it dries completely.
The salt dough pencil is ready!
Salt dough dachshund
You will need: salt dough, simple pencil, scissors, cardboard, paints, brush, rope, toothpick, foam sponge, clear varnish, PVA glue.
Master Class
- Draw a dachshund on the cardboard as shown in the image.
- Cut out the template.

- Roll out the dough to a thickness of 5 mm and cut out the dachshund according to the template.
- Roll out the oblong eyes, then glue them on.
- Blind the eyelids and glue them onto the eyes.
- Use a toothpick to outline the paws, nose, mouth, ear and body contours.

- Roll out an oval, then glue it onto the ear and smooth the seam with a wet finger. Use the same method to add volume to the dachshund's back and tail.
- Mark stripes in different directions around the entire perimeter of the dachshund, so that the stripes resemble wool.
- Dry the figurine.

- Glue a piece of rope to the back of the craft for further hanging.
The salt dough dachshund is ready!
Boletus mushroom made from salt dough
You will need: salt dough, light bulb, paints, brush, foil, cardboard, masking tape, superglue, PVA glue, paper napkins, clear varnish, stack.
Master Class
- Cover the light bulb with tape, then cover it with dough and dry the workpiece.
- Cut a ring out of cardboard and place it on the light bulb as a base for the hat.
- Form a hat from crumpled napkins, then secure with tape.

- Wrap the hat with foil.
- Roll out the dough to a thickness of 5 mm and stick around the cap.
- Remove the cap from the stem, cover the bottom with dough and make stripes in a stack.
- Glue the hat onto the leg.

- Mold the mushroom's arms, legs and nose, then glue them on PVA.
- Make a caterpillar and glue it to the hat.
- Dry the figurine.

- Paint the figurine, then leave to dry.
- Cover the craft with varnish and wait until it dries.
Boletus mushroom made from salt dough is ready! I recommend watching this video!
Funny salt dough pigs
You will need: salt dough, paints, brush, foam sponge, stack, thin rope, toothpick, black gel pen, PVA glue.
Master Class
- Roll 2 balls for the snout and use a toothpick to make the nostrils.
- Make a muzzle, glue a snout and eyes above it.
- Make triangular ears, glue them, then mark stripes with a stack at the junction of the ears and head.

- Make a heart and glue it to the bottom side.
- Make indentations along the edge of the entire circle.
- Using a toothpick, make 2 holes on the top for attaching the rope and 2 holes on the bottom for the legs.

- Roll up the arms and glue them in such a way that they hold the heart.
- Make the hooves and make holes in them for the rope.
- Dry the workpieces.
- Paint the blanks with black paint and let them dry.
- Wash off the paint from the convex parts of the workpiece under running water with a sponge and wait until it dries.

- Prime the figures with a sponge and white paint.
- Color the piglets.
- Draw small details with a black gel pen.
- Cover the craft with varnish and wait until it dries.

- Glue wool threads as hair.
- Make a pendant out of rope.
Funny salt dough pigs are ready! I recommend watching this video!
Lesson summary for modeling salt dough
on the topic: “Rosy apple on a platter” (2 parts)
The full cycle of making an “apple on a saucer” craft from salt dough takes two to three weeks. In the conditions of a preschool educational institution, in the middle group (4 - 5 years old), it is necessary to conduct 2 lessons (part No. 1; part No. 2) for 20 minutes each. Children of this age find it difficult to come to terms with delayed results. But on the other hand, this situation instills patience in the students. In addition, children develop their powers of observation. Children have the opportunity to observe the “behavior” of salt dough during natural drying at room temperature. They see how the properties of the dough change and how voluminous crafts are dried.
Part No. 1
Subject: Ruddy apple on a saucer (modeling)
Tasks:
Cognitive:
· Learn to sculpt an apple and a saucer from life;
· Learn the technology of working with salt dough;
· Learn to make a dent with your thumb and pull back the sides of the saucer;
· Learn to sculpt from a whole piece;
· Strengthen the ability to roll a ball in a circular motion.
Educational:
· Develop aesthetic taste when decorating a saucer.
Educational:
Cultivate patience and accuracy.
Materials: Flour, salt, water, vegetable oil, gouache, brushes, sippy cups, boards.
Dictionary enrichment:rosy, poured, saucer
Progress of the lesson
Guys, soon we will celebrate the Apple Savior and today we will make delicious, but inedible crafts from salt dough in the form of such wonderful apples. (Apple demonstration)
I have a real apple, not a magic one, but pourable, sweet, and juicy. And I have a regular saucer.
- Apple, what shape? What geometric figure does an apple look like? (round, on a ball)
- How should you sculpt a ball? (circular movements)
Invite the children to demonstrate the technique of sculpting a ball in the air.
- Right. I'll make a ball of salt dough.
But it's not an apple yet. Look carefully at a real apple and tell me what details need to be made to make the dough ball look like an apple? (a branch with a leaf on top and a small dry flower on the bottom)
Take a twig with a leaf from a bush and insert it into the ball.
On the other hand, insert a spicy clove.
The apple is ready.
- Look at the saucer. Tell me, children, what shape is it? (round)
To make a saucer, you need to take a lump of salted dough and roll it into a ball.
Make a dent in the ball.
Pull back the sides of the saucer. From time to time, pressing the dough with your fingers, turn the workpiece in a circle. The walls of the saucer must be formed evenly.
- Now let's start sculpting.
During productive activities, the teacher needs to monitor the correct execution of modeling techniques. If there are difficulties, prompt and show the children the correct actions with salt dough.
- What difficulties did you encounter while sculpting? (children's answer)
What did you like? (children's answer)
- What should we do with our crafts to make the apples and saucer brighter and more expressive? (color with paints)"
Children, today you have made wonderful preparations, and when the salt dough is dry, we will paint the apples and saucer with paints.
Part No. 2
Subject: Painting an apple and a saucer in gouache.
Tasks:
Cognitive:
· Learn to paint a three-dimensional object (apple);
· Introduce plate painting;
· Learn fine painting on the plane of a plate.
Educational:
· Develop aesthetic taste;
· Develop creative imagination.
Educational:
Cultivate accuracy, bring the work started to the end.
Progress of the lesson
Apple Spas is approaching, and our work continues. The apples and saucers that we made from salt dough last time have already dried out.
- Children, take the dough apple in your hands. Tell me what it is like? (hard, knocks loudly on the table, does not stick to your hands)
- In order for our apples to become bright, ruddy, plump, what do you think we need to do with them? (color)
That's right, today we will color the apples and saucers - we will paint them with paints. Look carefully at how to do this.
In front of you are paints, a brush, paper for painting the apple so as not to stain the table, water, a napkin to blot the brush from excess water.
Wet the brush in water and apply a thick coat of paint onto the bristles of the brush. Apply paint to the apple carefully, without leaving unpainted spots.
We painted the apple very beautifully. Now let's color the saucer.
- Children, what colors do you like? (children's answers)
So you paint the saucer with your favorite color. However, be careful not to leave white spots on the surface of the saucer.
After the children have painted the apples and saucers, you need to admire the crafts, praise them, and find out what problems the children encountered in working with paints.
The fairy tale about apples continues, but our work ends. Let's leave the apples and saucers on the window to dry.
From this article you will learn how to make salt dough yourself and how to dry it. Lots of photos and step-by-step instructions will help you make a dough craft for any holiday.
For modeling lessons with small children, it is better to use salt dough or Play Doh plasticine.
How to make dough for crafts: recipe
You can make the dough yourself; for this you will need just a few simple ingredients: flour, fine salt, citric acid, vegetable oil and water.
First mix 1 cup of flour with 0.5 cups of salt and 2 teaspoons of citric acid. Pour into a saucepan, add 1 tablespoon of oil to the dry mixture. Place over medium heat, gradually add water and stir. No more than 0.5 cup of water should be used. When the mass pulls away from the walls of the pan and becomes one lump, remove the pan from the heat. Take the mixture out, place it on a board sprinkled with flour, and knead it with your hands like regular dough.
If you want to make colored play dough, you first need to dilute dry food coloring in water. You can also add a little gouache to the finished dough and knead it well so that the color becomes uniform.
How to prepare salt dough for modeling?
Prepare salt dough. Paint it in different colors, depending on what you want to make. The dough can be made uncolored, divided into balls and add a little gouache of the desired color to each and knead. It's better to make the dough in regular colors, and then mix them to achieve the desired one.
Keep the dough in a bag, or wrap it in cling film, or put it in a closed container so that it does not dry out. If it is still dry, add a little water, and if it is too wet, add a little flour.


- Make the dough thinner and simply spread it on the base of the craft, so you can make butter on a piece of bread, or use brown dough to make chocolate frosting for a cake.
- Try on the food you made with the toy plates that you will later play with so that they match in size
- To stick the salt dough pieces together, use a wet brush. Apply a brush to the joint and stick the parts to each other
- When making food for dolls, it is very important to make the dough as much as possible the same color as the original, for example, the carrots should be orange, not yellow or red
- To prevent the colors from fading, open the craft with varnish. For activities with children, you need to use special harmless varnishes; they do not have an unpleasant odor because they are water-based

Drying figures from salt dough for modeling
There are two ways to dry salt dough crafts.
- Air dry crafts. It is best if you place them on a smooth surface and leave them for several days. When the craft is dry, turn it over or lay it on its side so that it dries on all sides.
- Baking in the oven. Preheat the oven well, place baking paper on a baking sheet, place crafts on top, place in the oven and turn off the heat. The oven should be closed and not opened until completely dry. You can also bake crafts at a temperature of 100°C, but in this case you need to watch them so that they do not burn
These two methods can be combined, for example, dry it in the oven for an hour, then leave it in the air, after a while in the oven, and so on until it dries.
Of course, if the craft contains other decorations (beads, beads), you need to dry it using the first method.
New Year's crafts made from salt dough
The child will really enjoy decorating the house before the New Year and making handicrafts together with his parents.
Christmas tree toys made from dough
 You can make excellent Christmas tree decorations from salt dough, and even kids can handle making them.
- Prepare play dough in different colors or uncolored
- Roll out a flat cake and squeeze out a shape; you can use cookie cutters
- Make a hole with a cocktail straw so that you can hang the figurine on the Christmas tree.
- Decorate the toy as you and your child want: stick multi-colored balls on the Christmas tree, make a garland for it, let it rain, add a white snowball to the toy
- Unpainted dough can be dried first and then painted with paints or markers
- Dry the dough or bake in the oven
- Pass the ribbon through the hole and hang the toy on the tree
You can make a lot of holes in the figures.


Or stick beads, beads and other beautiful stones into the dough, but in this case these toys cannot be baked in the oven.


You can decorate toys with ribbons or decorative ropes.

After the dough has dried, apply PVA glue to it and sprinkle the figures with glitter.


Color the uncolored dried dough with a permanent marker.


Cut out a figure in the shape of a mitten, make it a beautiful colored ribbon from colored dough and decorate it with a homemade button. This figurine can be baked in the oven.


Print the baby’s palm and draw Santa Claus in it - it will not only be a wonderful toy for the New Year tree, but will also remain as a keepsake.


You can also make a Santa Claus toy like this. To give him a beard, use a garlic press. 
Make these other gingerbread toys from brown dough.

Making a New Year's candle from dough
To make a New Year's candle you will need modeling dough of different colors, a cardboard cylinder, for example, from a roll of paper napkins and red and yellow napkins.
- Let your child roll colorful sausages.
- Stick them on our cardboard base


- Decorate it with colorful balls
- You can simply cover a cardboard cylinder with one color and then decorate it


- Make a fire out of napkins and attach it to the top of our candle


Christmas tree made from dough
- First make a preparation for the Christmas tree; for this you will need a cardboard container of juice or milk. First cut off its top, cut along the side folds, and open it. You need to cut off the excess from the rectangles so that you get isosceles triangles. See how to do this in the diagram below


- Glue a cardboard base for your Christmas tree

- Now let your child decorate it: let him cover it with green dough - you will get a Christmas tree. All that remains is to add balls, a garland, a star, and don’t forget about the gifts under the Christmas tree


You can also make a Christmas tree like this

Easter crafts made from salt dough
For Easter you can make the following crafts from salt dough:
- Decorated eggs made from flatbread dough


- Bunny figures cut from salted dough flatbread.
- Decorated three-dimensional Easter egg


- Egg cup


Easter eggs made from dough
Even a baby can cope with this task.
- Take the dough and mold it into an egg-shaped figure.
- Decorate it as you and your child want.


You can use mixed dough of different colors for the base, or you can make a base from unpainted dough and then paint it with paints or markers. Open the eggs with glue and sprinkle with cosmetic glitter. Glue the multi-colored balls; to do this, moisten the joint with a wet brush. Press beads, pasta, cereal, and other decorations into the eggs. Make prints with different objects.
In general, fantasize!


Dough egg cup
For this you will need a cardboard cylinder, dough and paints.
Cover a cut circle of cardboard with unpainted dough and mold it into a tail, head and other parts, as shown in the diagrams below.


Don't forget to cover the stand on all sides with dough.

Decorate the craft as your imagination dictates; you can use gouache or watercolors.

Open with water-based varnish to make the colors brighter and the craft to last longer.


Dough crafts for February 14th for Valentine's Day
What does everyone associate with this wonderful holiday? Of course the heart! Let's make a festive heart with your child and give it to your parents.
Salt dough heart


Here, as everywhere else, we first make the base, in our case the heart, and decorate it!


You can decorate it with roses, it will be very beautiful. How to sculpt roses, see step-by-step instructions with photos below.

You can make a keychain like this with paws.

These cute couples are made very quickly and easily.


You can make a lot of these heart figures, make holes in them and make a garland out of them, which you can use to decorate a wall in your house.


Dough photo frame
Make an empty heart, decorate it and use it as a frame for a family photo, securing it on the back with colored cardboard.


Salt dough decoration
This kind of love fish will definitely suit your mother’s outfit on this special day.

Crafts from dough for March 8
On March 8th you can make these flower keychains for mothers, grandmothers, aunts and sisters. They can be done with younger children. You can use multi-colored dough or uncolored dough, and then decorate it with paints.


You can make this flower candlestick for a gift.


Make such interesting medals with your children, and most importantly, they are all different. Let the child give them himself.


Make figures in the shape of a figure eight and decorate them with flowers, stones, beads, in general, whatever your imagination allows.

Make a pendant with your child, for example, in the shape of a heart and decorate it: make flowers, leaves, decorate with paints, sign a congratulation.

Salt dough roses
- Take play dough, need colors
- Making a cone


- Roll the ball, flatten it carefully into a round cake
- Stick the ball to the cone


- We make a second ball and glue it on the other side - we have a bud
- We make a few more balls and also sculpt petals from them. We chain them in a circle


- We bend the upper edges of the petals slightly back, and press the sides to the center


- We make several side by side, depending on how lush you want the flower to be.
The rose is ready!

 If necessary, make leaves from green dough, press the veins with a toothpick. Make legs from sausages. Combine all the details into one flower.
Crafts from dough for February 23


You will definitely like this medal.

Airplane - craft made from salt dough
A wonderful gift for dad or grandfather would be a salt dough airplane.
- Roll out the base for the figure - this will be the body
- Bend one side of it a little - this will be the tail. Attach the remaining parts to it


- Roll up the wheels and fenders for it

- Go over with a damp brush and attach the parts to the body

- Blind and attach wings in the form of triangles on toothpicks


- Make a propeller and also attach it to the body using a toothpick


- Let the figurine dry for several days


- Decorate the airplane with gouache

Crafts from dough for Maslenitsa
Maslenitsa is an ancient holiday that has many symbols and traditions. Crafts for this holiday are very diverse, you have plenty to choose from.
For the little ones, you can suggest making a sun, which symbolizes the onset of spring.

 This is some sunshine for older children.

 Invite your child to make their own pancakes from salt dough.

 Pancake keychains


Panels and pictures made from salt dough
With older children, you can make a picture from salt dough.
For example, it could be a fruit basket. Follow the step-by-step instructions with the photo below.
- Roll out the uncolored dough to about 0.5 cm thick
- Prepare a basket template and, applying it to the dough, cut out the basket from it.
- Squeeze out the dough using a garlic press, twist it into flagella, stick it, moistening the joint first, onto the handle of your future basket. You can also add flagella to the rim


- Using a stack or knife, push through lines to imitate basket weaving


- Squeeze out the rolled out dough with a mold or cut out several leaves according to the template. Sell them veins
- Stick leaves on the basket


- Now prepare the fruits: apples, plums, grapes, etc. Roll them into balls of different sizes and give them the desired shape. For apples, stick cloves in the place where the dried inflorescence should have been, the apples will look like real ones
- Combine everything in one picture

- Leave your craft to dry for several days, preferably naturally
- Decorate as you wish
This is a simpler picture you can make with smaller children.
- Draw a background for it
- Draw the outlines of the character figures
- Ask your child to stick the dough without going beyond the outline.
- Leave the painting to dry
- When it's dry, invite your child to decorate the characters with paints.
- Add small details
- Open the picture with varnish, put it in a frame and you can hang it on the wall

Step-by-step dough crafts
Below are some step-by-step instructions with photos for modeling salt dough with children.
Salt dough beads
- We take colored dough, it can be one color, it can be different
- We roll balls out of it, preferably evenly and of the same size. You can make the size descending
- Pierce the balls carefully in the center with a toothpick
- We leave them to air dry for several days. Periodically turn them over to different sides.
- When the balls are dry, carefully remove the toothpicks
- We string the resulting beads onto a string or ribbon.
- You can paint the beads with paints or markers


Horseshoe made of salt dough
- Roll out the dough into a flat cake, 1 cm thick
- Attach the horseshoe template and cut out the figure with a knife
- Blind the leaves, cut off the excess, press the veins on them
- Make berries and a flower, use a toothpick to make holes in the berries and stripes on the flower
- Lubricate the horseshoe with water and stick all the parts
- Use a toothpick to make holes around the perimeter of the horseshoe. Make two through holes at the top to hang the figurine on a cord
- Leave the horseshoe until completely dry or bake in the oven
- The dough can initially be taken of a certain color for each part, or you can decorate it with paints at the end


Dough star
- Roll out the dough into a layer approximately 1cm thick
- Using a cookie cutter, cut out a star or other shape
- Gently lubricate the corners with a wet finger so that they are smooth
- Decorate the figurine: make eyes, mouth, nose, poke holes with a toothpick, add decorations
- Bake in the oven or air dry
- Open with varnish


Dough caterpillar
- Rolling a sausage from green dough
- Cut it into equal circles and roll them into balls
- We stick the balls together, do not forget to moisten the joint.
- Making a face for the caterpillar
- We pierce the figure with a toothpick or a pin in the place where we will attach it to the ring
- Drying our craft


Salt dough apple
- Roll out the ball of dough into the shape of half an apple. To ensure an even cut, press it onto a flat surface.
- Add a flat white center
- Roll apple seeds and a tail from brown dough. We make leaves from green
- We collect the figurine and dry it

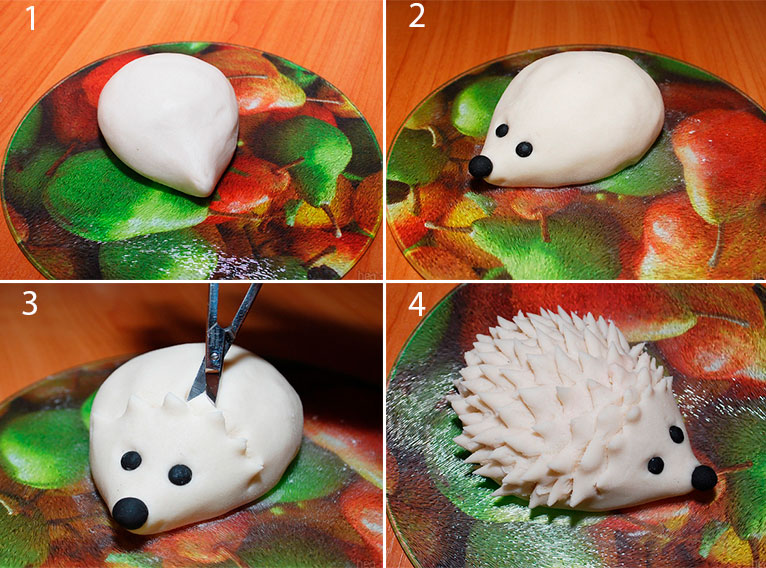
Crafts made from salt dough - hedgehog
- Form the body and head of a hedgehog from uncolored dough.

- Make him a nose and eyes, you can use black dough or peppercorns


- Using nail scissors, cut the dough, making needles, lift them up a little. Cut the second row in a checkerboard pattern, and so on until the end.

- Leave the hedgehog to dry. When it has completely hardened, you can decorate it with paints and spray it with varnish.

Crafts made from salt dough - animals
You can sculpt many animals from salt dough with children. Below are some step-by-step instructions with photos.
Dough sheep
- Roll 4 balls - these will be the sheep's feet. Place them in a square, pressing their sides tightly against each other (look at the photo)
- Fold up a piece of foil and place it inside the dough ball. Roll it into a ball - this will be the body of a sheep
- Add a head to the sheep, make balls-eyes, horns and ears from sausages
- To imitate wool, make a lot of small balls and stick them around the back of the figure, pressing them down a little
- Dry your craft and decorate with paints and/or markers


Salt dough owl
- Roll out the dough into a round cake
- Use a felt-tip pen cap to press waves, imitating plumage.
- Fold the sides inward - these will be wings
- Fold the top part towards the center too, extending it a little on the sides - this will be the head and ears
- Stamp the eyes with a cap and add a beak with a toothpick
- Dry and paint


Dough elephant
- Roll the ball, stretch it out a little - this will be the body of the elephant
- Make 4 thick sausages - these will be the legs
- Make a trunk from another one
- Make a tail out of a thin sausage
- Roll out two flat cakes, put plates of smaller diameter and pink color on them - you will get ears
- Collect everything into one figurine and don’t forget about the eyes
- Dry the elephant and open it with varnish


Dough crafts - cat
- Cut out a cat template from cardboard


- Roll out the dough into a 0.5 cm layer
- Attach the template and cut out the cat from the dough


- Let the dough dry
- Using sandpaper, sand around the perimeter of the figure.

Paint the cat with a pencil and then with paints, let dry

Frame the panel

Making fish from salt dough
- Roll out the dough to a thickness of 0.5 to 1 cm
- Cut out the fish according to the template
- Decorate it: make voluminous eyes, fins and a tail, imitate scales with caps from felt-tip pens or other improvised means
Let the mushroom dry and decorate it

Dough crafts - fruits and vegetables
You can make many different vegetables and fruits from salt dough, which you can then play with and feed your dolls.
Remember that the colors of food for dolls should be matched as closely as possible to the original ones.


By following the step-by-step instructions and photos, you can make interesting figures from salt dough, which you can then give to friends and family for various holidays. We hope in this article you found a lot of interesting work and useful information. Have fun activities and beautiful crafts!
VIDEO: Craft from salt dough “Owl”
Similar articles
-
Features and recipes for making onion confiture and jam
In France and Italy, onion confiture is often served with game, poultry, cheeses and pates. This is an onion sauce with a jam-like consistency. It has a sweet taste with spicy notes or pronounced sourness. The taste of onion confiture...
-
Soup with Chinese cabbage and melted cheese: recipe with step-by-step photos Cabbage - so different and invariably healthy
Guys, we put our soul into the site. Thank you for revealing this beauty. Thank you for the inspiration and goosebumps. Join us on Facebook and VKontakte Sometimes you can create something very interesting from the most ordinary products....
-
Filled pancakes, recipe with photos
Stuffed pancakes with an interesting, spicy and incredibly tasty filling: pancakes with cheese and salted red fish, recipe from Svetlana Burova. Using this recipe, you can bake pancakes and stuff them with any salty...
-
Champignon soup: recipes with photos
Champignons, unlike seasonal mushrooms growing in forests, can be purchased at any time of the year. These food products are great for preparing both everyday and holiday meals. In addition, there is far more than one recipe...
-
Dough for fluffy pies in the oven with dry yeast
Pies are immediately memories from childhood. Is it true? Thoughts of grandma mixing dough in the kitchen while we were having fun in the garden. And, of course, an indescribable aroma and taste. Today we won't make pies, we'll just give you...
-
Recipes for waffle iron Gourmand
Hot sandwiches and omelettes - all these dishes can be easily prepared in an electric waffle iron. For culinary experiments, you can use devices that were produced by Soviet defense factories during the era of conversion, or modern devices...